Salesforce 1 Lightning Connect to SAP – Step by Step
OK, so your company has SAP on the back end and getting data to your salesforce.com instance has been a series of data loader exercises or waiting for someone on the middleware team to get to your integration request…Well that’s about to change big time! Salesforce 1 has been making a very big push to allow for direct system to system integration and you will no longer require the Data Loader or other middleware tools to connect the 2 systems. You can directly write APEX code or create a report and the external data looks like a custom object in the salesforce.com system.
What is the take-away for the Saleforce.com Admin/Developer? You can now perform real-time queries against the back end SAP ERP system WITHOUT middleware! Imagine writing an APEX class that reads data from databases that does not exist inside your Salesforce.com Org! Pretty cool stuff!
One note before you begin this Step by Step Blog, It assumes that you have some relationship with SAP for example your company uses SAP products and you wish to connect your salesforce.com system to it, you’re a student or a potential SAP customer but you first wish to “try it out” by using a public SAP System.
So before you begin please make sure you can complete the checklist of items, if you don’t you will not be able to get this exercise completed. Here is what you need:
1. A logon to SAP’s Community Network scn.sap.com this is a Free, Public logon that you can sign up for. Think of it just like success.salesforce.com
2. A logon to a Salesforce.com Developer Edition Org, again a Free, Public logon that you can use to test out your Lightning Connect application.
3. Your choice of Caffeine… Cannot start any exercise without it!
OK…enough talk…. Let’s get to it!
Step 1 – Signup for your SAP Community Network Logon
We need to get your SAP Access! Click on this link here and select the “Join Us” link to get your free logon!

Now you will get a popup that will allow you the ability to get your logon. Here is a screen shot of the filled out form. Remember even a “Student” can access SCN!

Once you register you are now part of the SAP Community Network so you can access a public SAP System.
Step 2 – Request access to the Public SAP System
Once you have requested your free SCN logon, you can now request access to the public SAP instance, this will allow you the ability to test out your Lighting Connect components.
Here I have already logged onto the SCN system and I wish to request public SAP Access by clicking the link here. If you have done this correctly you should see the following screen:


Click the “Register” Button to get your Public SAP Logon sent to you!
OK the next step is to receive an email from SAP which will give you a SAP User id and Password. Once you have this information you need to save it for use inside the salesforce.com setup.
OK… I know the next question will be, I deleted the email or forgot to write down my password. If that should happen to you click this link to request an SAP password reset. Then you will get an email with the password reset.
Step 3 – Logon to Salesforce and perform your Lightning One Connect Setup
Now we have everything we need to start the Salesforce setup. We first logon to our Developer Edition Org so that we can test out Lightning 1. If you don’t have a Developer Edition salesforce org please click here.

If you get this page you have successfully registered for a Salesforce Developer Edition.
After you have checked your email you should be able to click the link to setup your Salesforce password. A screen like this will appear:

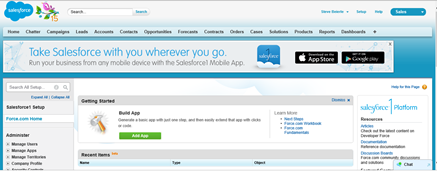
If you have successfully logged on you should see a home screen like this:
Step 4 – Configure the Lighting Connector for SAP Access
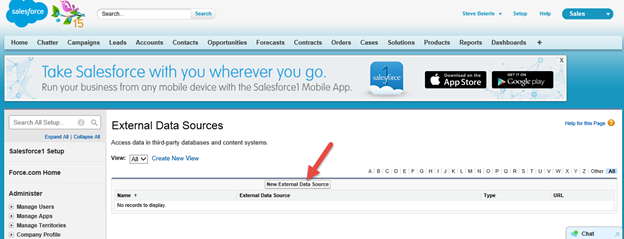
OK, we now can go into the setup function of Salesforce and attempt to configure the connection to the public SAP system. Here is a screen shot of this and the menu path to this is as follows:
Setup -> Develop -> External Data Sources

Then on the left side of your screen after selecting “Setup”.

Now press the “New External Data Sources” Button.
Now fill out the screen with the following information. For reference I have also listed each of the values you want to select here:
Label: SAP Data
Name: SAP_Data
Type: Lightning Connect oData 2.0
URL: https://sapes5.sapdevcenter.com/sap/opu/odata/sap/SALESORDERXX/
Connection Timeout: 120
High Data Volume: Unchecked
Compress Requests: Unchecked
Include in Salesforce Searches: Checked
Custom Query Option: Blank
Format: AtomPub
Certificate: Blank
Identity Type: Named Principal
Authentication Protocol: Password Authentication
Username: <The SAP Supplied user-name from Step 2>
Password: <The SAP supplied password from Step 2>
When you are done the screen should look like this:

Now press the “SAVE” button and see the following..

If you see the above screen Salesforce is happy with the data you have provided but it is NOT yet proof that you can actually connect to the public SAP System! That only occurs after you press the button “Validate and Sync”. If you have done everything correctly you will see the following screen:

The above screen shows that we were able to successfully log onto the SAP system and it returned the list of custom objects that we can return! We now are going to select the Sales Order Collection tables so that we can view this data inside salesforce and also write Apex Code against this SAP data even though it does not actually get loaded into salesforce! (Hey… .Save your disk space for other Salesforce stuff!)
Step 5 – Press the Sync button to have salesforce read the SAP Tables and create the corresponding custom objects inside salesforce.

What did you just do you might ask? Well Salesforce logged onto the SAP System and proceeded to “read” the description of the SAP data and proceeded to create a custom object and the custom fields needed to query this data inside salesforce! A closer look at this is as follows:

Now if we click the link “SoHeader” we can see the custom object and the custom fields that were created!
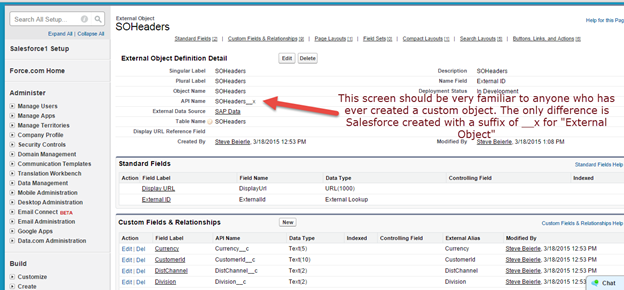
If you have ever coded a Apex Class or an Apex Trigger the API name should look pretty familiar to you. Objects that end in __c(underscore, underscore, C) are be default consider custom objects in salesforce, which means that you created them. Salesforce Lightning Connect now utilizes the suffix __x (underscore, underscore, X) with the “X” for External.
At this point you can now directly read data from your back end SAP system without any middleware, adapters, plug-in’s or whatever the latest buzz-word that comes out for an integration tool. But let’s not stop here, we want to read and display this data on a page layout. So the remaining steps will assist you in performing the needed steps to get this data to display real-time in your saleforce system.
Step 6 – Read some SAP Data and display it on the Accounts Page, First Create the Apex Class.
OK, for all you salesforce Admin’s you may not be a developer but you can cut and paste can’t you? Here is a small amount of Apex code that we will need to read the SAP data when an account is being displayed. We want to see some SAP Sales Orders when we display the account in salesforce. We want the data real-time, meaning that if another sales order is created just a minute later that data will be immediately available inside salesforce! No Data Loader, No Batch Bulk API runs… just real-time access without any managed packages or SAP transports!
OK, let’s create the Apex Class. Go to Setup -> Develop -> Apex Classes


Now we want to build the new Apex Class. Press the “New” Button to create a blank screen for entering the Apex code.

Once you have the following screen up cut and paste the code provided in the Code Editor section of the screen as listed below:

Here is the code that you want to cut and paste into the Apex Class.
public class SAPsalesordersExtension {
//
// This class will read the custom object SOHeaders__x, that was created by the oData sync. We // can then use this to display the specific sales order data by customer number via a VF page...
//
private final Account acct;
List<SOHeaders__x> orderlist;
public SAPsalesordersExtension(ApexPages.StandardController stdController) {
Account a = (Account)stdController.getRecord();
List<Account> res = [ SELECT Id, AccountNumber from Account WHERE Id = :a.Id LIMIT 1];
this.acct = res.get(0);
}
public String getSAPCustomerNbr() {
return acct.AccountNumber;
}
public List<SOHeaders__x> getOrderList() {
if (null == this.orderList) {
orderList = [ SELECT ExternalId, CustomerId__c,
SalesOrg__c,
DistChannel__c,
Division__c,
DocumentDate__c,
DocumentType__c,
OrderId__c,
OrderValue__c,
Currency__c
FROM SOHeaders__x where CustomerId__c = :this.acct.AccountNumber LIMIT 300 ];
}
return orderList;
}
} // end of oData Apex Class
OK, when you’re done the code should look like this with no errors. Now if something is mistyped you may receive a compile error. If you do please send a screen shot to me or post it in the comments section so that everyone can benefit by solving the issue. But hopefully you will have a screen just like this one and we can continue.

Step 7 – Create a Visual Force Page to display your data.
OK, so now we have an Apex class that will read the SAP data, now we would like to display this on a Visual Force Page. Here we walk thru the steps to create a simple VF page that will display the data.
OK, let’s create the Visual Force Page. Go to Setup -> Develop -> Page


Now press the “New” Button to create our new VF page.

OK, this is what the screen will look like when you hit the “New” Button.

Now let’s update this VF page to include the following information.
Label SAP_oData_Example
Name SAP_oData_Example
Description A simple example of getting SAP Data without any middle-ware!
Also remove all of the <apex: page> …. </apex:page> tags from the Visualforce markup section of the screen. We don’t need any of this. And Replace that code with the following:
<apex:page standardController="Account" extensions="SAPsalesordersExtension">
<style>
td {
border-bottom-color: rgb(224, 227, 229);
border-bottom-style: solid;
border-bottom-width: 1px;
background-color: #FFFFFF;
border-collapse: separate;
padding-bottom: 4px;
padding-left: 5px;
padding-right: 2px;
padding-top: 5px;
font-size:12px;
}
th {
border-color: rgb(224, 227, 229);
border-style: solid;
border-width: 1px;
background-color: #F7F7F7;
border-collapse: separate;
font-size: 11px;
font-weight: bold;
padding-bottom: 4px;
padding-left: 5px;
padding-right: 2px;
padding-top: 5px;
font-size:12px;
}
table {
border-color: rgb(224, 227, 229);
border-style: solid;
border-width: 1px;
}
</style>
<apex:dataTable value="{!orderList}" var="order" width="100%">
<apex:column >
<apex:facet name="header">Id</apex:facet>
<apex:outputText ><atarget="_top" href="/x/SOHeaders__x{order.Externalid}">{!order.Externalid}</a></apex:outputText>
</apex:column>
<apex:column >
<apex:facet name="header">Sales Org</apex:facet>
<apex:outputText style="float:right">{!order.SalesOrg__c}</apex:outputText>
</apex:column>
<apex:column >
<apex:facet name="header">Dist Channel</apex:facet>
<apex:outputText style="float:right">{!order.DistChannel__c}</apex:outputText>
</apex:column>
<apex:column >
<apex:facet name="header">Division</apex:facet>
<apex:outputText style="float:right">{!order.Division__c}</apex:outputText>
</apex:column>
<apex:column >
<apex:facet name="header">Customer Id</apex:facet>
<apex:outputText style="float:right">{!order.CustomerId__c}</apex:outputText>
</apex:column>
<apex:column >
<apex:facet name="header">Document Type</apex:facet>
<apex:outputText style="float:right">{!order.DocumentType__c}</apex:outputText>
</apex:column>
<apex:column >
<apex:facet name="header">Order Id</apex:facet>
<apex:outputText style="float:right">{!order.OrderId__c}</apex:outputText>
</apex:column>
<apex:column >
<apex:facet name="header">Order Value</apex:facet>
<apex:outputText style="float:right">{!order.OrderValue__c}</apex:outputText>
</apex:column>
<apex:column >
<apex:facet name="header">Currency</apex:facet>
<apex:outputText style="float:right">{!order.Currency__c}</apex:outputText>
</apex:column>
<apex:column >
<apex:facet name="header">Date</apex:facet>
<apex:outputText style="float:right">{!order.DocumentDate__c}</apex:outputText>
</apex:column>
</apex:dataTable>
</apex:page> </apex:page>
Now press the “SAVE” key. Hopefully you have no typo’s and you salesforce will allow you to save your Visual Force Page. If you have any errors you will NOT be able to save the VF page. If this happens check you’re typing or cut and pasting to make sure you are not missing anything. Please post a screen shot if you have any errors!
If you have no errors the screen should look like the following:

Step 8 – Assign the Visual Force Page to the Accounts Page Layout.
OK, at this point we have built everything we need to access SAP data real-time. All that is left to do is to put this VF page on the Accounts Page to display the data.
This is done as follows: Setup à Customize -> Accounts -> Page Layout


Now since this is a brand new Developer Edition Org, the Page Layouts are pretty straight forward. If you followed this blog exactly your Page Layout will look exactly like mine. However, if you are performing this in a sandbox you may have more than this number of Page Layouts. Use your good judgment on which page layout to modify.
I will modify the basic “Account” Page Layout since this is one of the more commonly used Page Layouts. Click on the “Edit” function to modify this page layout.

The following should be your screen once you are in edit mode for the Page Layout.

The first thing we want to do is create a new “Section” on the screen where the SAP data will reside. This is done by mouse clicking on the word “Section” on the screen and holding the mouse key down and “dragging” the Section to the spot on the screen where we want to have a new Section.
Here is a screen shot of this..

Here I am dragging the “Section” down the page until I find a spot where I want to create a new “Section”. Here is a screen shot of me dragging a new section onto the page. Continue to drag downward until you find a spot where the Icon changes to “Green”.
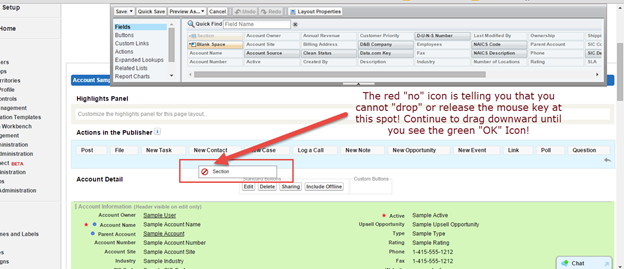
Here is a screen shot of a spot on the Accounts Page Layout where we can create a new section. Release the Mouse key here and you will be creating a new section for the SAP Data.

Now once we release the mouse key a popup box will appear which will give us the opportunity to name the new section. Here is a screen shot before I rename the new section.
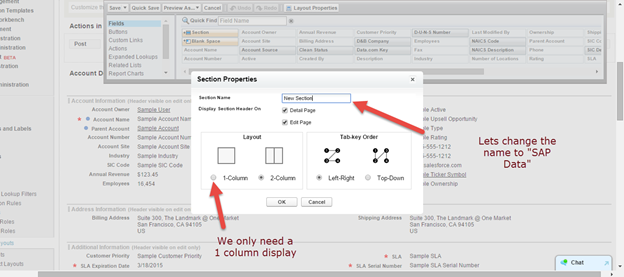
Now here is a screen shot after I have renamed the Section, selected the 1-Column Layout and pressed the “OK” Key.

Now let’s drop the Visual Force Page into the newly created “SAP Data” Section. This is done by grabbing the scroll bar and locating the Visual Force Page list. Once you locate it click on it and all available Visual Force Pages will be available for you to drag onto your Accounts Page Layout.

Here we want to scroll to the section to add the newly created Visual Force Page to the screen.
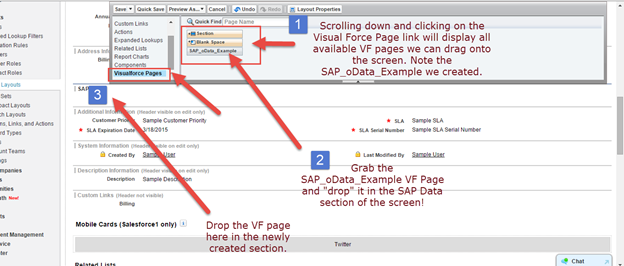
Now we drop the VF page on the screen.

Once this step is completed the only thing remaining is to “Save” the updated Accounts Page Layout.

Step 9 – Test your results.
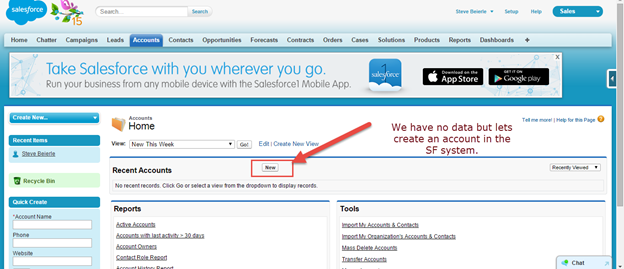
OK, now we have completed all the steps necessary to test out our work. Now we can just click on the “Accounts” Tab and bring up any account. Since this org has no data, I will create a new account. Just press the “New” Button as follows:
Now I will create a record that I know exists in my SAP system. Here is a screen shot of the Account that I am creating in salesforce.
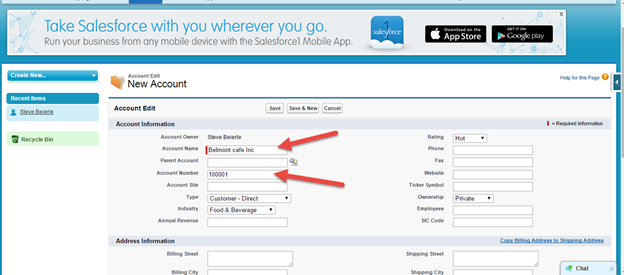
Use the following data:
Account Name | Belmont cafe Inc |
Account Number | 100001 |
Why did we use this data? Because I quickly checked the public SAP System for a customer master record. Here is a screen shot of this.

If you noticed the SAP system is ES1 (in the lower right hand corner). You don’t need to know how to log onto the SAP System but if there is any interest I can create a step by step blog to get you SAP access if you like (Remember this is a public SAP system so you can gain access). Please just post a comment and I will consider doing this.
Now just press the “Save” key on the salesforce screen and you have saved this Account in Salesforce.

Now let’s just click on the newly created account.

Now we can see the details of this account and all the real-time SAP data that was returned!


Some of these fields may look not too familiar to the salesforce admin but I can assure you to the SAP Sales Order Management team, they know exactly what is being displayed here!
Step 10 – Hit Starbucks!
Hey after all this hard work, it’s time for a nice hot cappuccino! …Wouldn’t you agree?